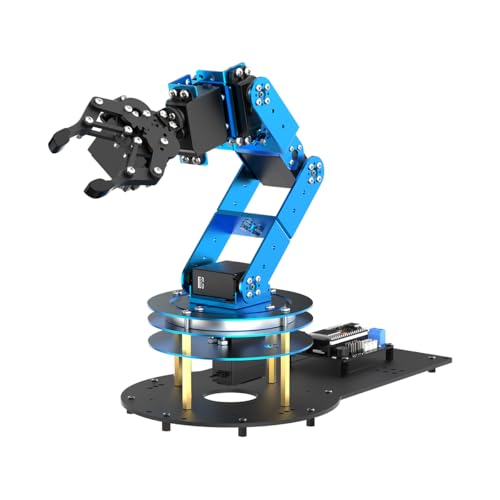
Hiwonder LeArm 6-DOF Robotic Arm Kit
Open-source 6-servo arm with claw, PC/app control and tutorials — the classic "first serious arm" for makers.
Best for: Your first programmable 6-DOF arm
The maker’s guide to building a robotic arm yourself. Pick a build, follow the wiring and code, and watch it move. Arduino, Raspberry Pi, 3D-printed, stepper-motor and budget cardboard projects — all explained in plain language.

Every guide lists exact parts, wiring diagrams and copy-paste code — written to actually work, not just to read.
Degrees of freedom, torque budgets and inverse kinematics explained without a robotics degree.
From a $10 cardboard build to a precision 3D-printed manipulator — start where you are.
A DIY robotic arm is a robotic manipulator you build yourself: a chain of rigid links connected by motor-driven joints, ending in a gripper or other tool. Each joint adds a degree of freedom — an independent way the arm can move — so that with the right angle sent to every joint, the gripper lands exactly where you want it.
The beauty of building one yourself is that it teaches the entire core of robotics in one project: structure, actuators, power, control and kinematics. A hobby arm uses the same ideas as a $50,000 industrial robot — just with hobby servos instead of precision motors, and cardboard or 3D-printed parts instead of machined aluminium. If you’re brand new, start with our plain-English guide to how to build a robotic arm, or read how robotic arms work to understand the mechanism first.
Not sure where to start? Match the build to your tools and experience.
Build a moving gripper from cardboard and a couple of servos — no soldering, no programming. The fastest way to understand how a joint and an actuator work.
IntermediateWire up 4–6 servos to an Arduino, write your first motion code, and control the arm from a potentiometer or your keyboard. The classic maker build.
AdvancedPrint a rigid 6 DOF frame, drive it with high-torque servos, and add inverse kinematics so you can command a target point in space rather than each joint.
Every approach to building a robotic arm at home, by cost and difficulty.
The exact servos, boards, controllers and kits we recommend — matched to the guides. Browse all parts & kits →
Open-source 6-servo arm with claw, PC/app control and tutorials — the classic "first serious arm" for makers.
Best for: Your first programmable 6-DOF arm

Low-cost open-source LeRobot arm for AI / imitation-learning projects — compatible with NVIDIA Jetson.
Best for: AI & machine-learning builds

Six 55g metal-gear servos — enough to drive a full 6-DOF arm in one buy.
Best for: Driving a full 6-DOF arm
Learn how to build a robotic arm from scratch — the parts, degrees of freedom, wiring and code you need, plus a clear path from your first servo to a working 6-axis arm.
Builds by platformBuild a 4-DOF Arduino robotic arm with hobby servos. Full parts list, wiring diagram, power tips and copy-paste Arduino code to control it with potentiometers or serial commands.
Parts & hardwareEvery part you need to build a DIY robotic arm — servos, controller, driver, power supply, frame, gripper and fasteners — what each component does and how to choose it.
Builds by platformHow to build a 3D printed robotic arm — choosing a design, the best servos and bearings, print settings for strong parts, and assembling a precise 6-axis manipulator.
Builds by platformBuild a Raspberry Pi robotic arm — when to choose a Pi over Arduino, controlling servos with a PCA9685, adding camera vision, and driving the arm from a web browser with Python.
Projects & ideas15 DIY robotic arm projects sorted beginner to advanced, with parts, cost, and skills for each. Pick your next robot arm build and start today.
A DIY robotic arm is a robotic manipulator you build yourself from a chain of motor-driven joints ending in a gripper. Hobby versions use an Arduino or Raspberry Pi, a few servo motors, and a structure made from cardboard, laser-cut wood, or 3D-printed parts — recreating, at low cost, what an industrial robot arm does.
Not at all to start. A beginner can build a working cardboard or wooden arm with a few hobby servos and an Arduino in an afternoon. Difficulty scales with what you want: a 6-axis, 3D-printed arm with inverse kinematics is an advanced project, but every guide here breaks the work into small, testable steps.
A basic Arduino + servo arm costs roughly $25–$60 in parts. A solid 4–6 DOF 3D-printed build runs $80–$200 depending on servo quality and whether you print the parts yourself. Pre-made kits range from $40 entry kits to $300+ for metal-gear, high-torque platforms.
At minimum: a microcontroller (Arduino Uno or an ESP32), 3–6 hobby servos (SG90/MG996R class), a structure (cardboard, laser-cut wood, or 3D-printed parts), a separate 5–6V power supply for the servos, and jumper wires. Our parts guides cover exactly what to buy and why.
Yes. You can build an excellent robotic arm from cardboard, laser-cut plywood, or an off-the-shelf kit — no 3D printer required. A printer adds rigidity and precision for advanced builds, but it is never a prerequisite to get started.
Use an Arduino (or ESP32) when you mainly need precise, real-time servo control — it is cheaper, simpler, and rock-solid for motion. Choose a Raspberry Pi when you want camera vision, machine learning, or a web interface on top of the arm. Many advanced builds use both: a Pi for the brain, an Arduino for the muscles.
Common uses include pick-and-place and sorting, automating a small repetitive task, camera-guided grabbing, teaching robotics and programming, and simply learning how actuators, control and kinematics fit together. It is one of the most hands-on ways to learn real robotics.